Welcome, Guest
Username: Password: Remember me
Join us on a new 12-month journey as we bring you bring you another spectacular quilt designed especially for TQS by Sue Garman. The 2017 TQS BOM Halo Medallion Quilt features a stunning variation of a feathered star surrounded by multiple scrappy borders. As icing on the cake she has included flying geese rings and delectable mountain blocks. Once again Sue has created a quilt for you that is sure to be a family heirloom in your home.

TOPIC: Month 1 The Halo Star Block

Month 1 The Halo Star Block 08 Jan 2017 16:34 #139188

  • GigiWendy
  • GigiWendy's Avatar
  • OFFLINE
  • Posts: 108
  • Thank you received: 47
Lovely stars, everyone. The fabric options seem endless.

Renata - The batiks are beautiful and I really appreciate all the tips.

My star medallion is done. It's a tribute to my Mom's artwork. Spoonflower reproduced an image of a watercolor in fabric. The center, first two rings of points and the tips are all fussy cut from the art piece. This has been a tremendous learning experience.

I left the paper in place (it's the Print and Piece product). My medallion is shy of 16 and 1/2 by 1/16 of an inch. But from outer sewing line to opposite outer sewing line is right at 16 inches. I'll use the sewing line rather than a 1/4 seam to get the center in place with a finished 16 inch size. (My guess is that I shaved off a bit too much when I cut.)

For the large fussy cut pieces, I created a freezer paper template by printing directly on freezer paper, cutting the paper on the seam lines, and ironing it on the bit of fabric that I wanted for the large inner points. The freezer paper made placement of the pieces much easier and mostly worked.

Following Renata's advice - I used the clips as extra hands! Then I hand basted most long seams before machine sewing.

One fix I have in mind is for the inner halo (white on Sue's pattern but yellow, green and pinkish on mine). The flower buds were not quite large enough and more white shows than I would like. I may try to "paint" the white out if I'm brave enough later!

Now it's time to rest up for the February borders!
Thanks to all for sharing this fun trip.
Wendy
Attachments:

Alexandria, VA
The administrator has disabled public write access.
The following user(s) said Thank You: Renata

Month 1 The Halo Star Block 08 Jan 2017 16:25 #139187

  • clhdabb
  • clhdabb's Avatar
  • OFFLINE
  • Posts: 688
  • Thank you received: 67
Beautiful! Love your colors!

in 'Yes, I Know the Way to San Jose...', California, USA
The administrator has disabled public write access.
The following user(s) said Thank You: durstgirls

Month 1 The Halo Star Block 08 Jan 2017 15:48 #139185

  • durstgirls
  • durstgirls's Avatar
  • OFFLINE
  • Posts: 112
  • Thank you received: 67
Here is my halo medallion.
Attachments:
The administrator has disabled public write access.

Month 1 The Halo Star Block 08 Jan 2017 15:32 #139184

  • durstgirls
  • durstgirls's Avatar
  • OFFLINE
  • Posts: 112
  • Thank you received: 67
Thank you Barbara. I decided I am going to make another one and will use your suggestions above which will be helpful. I'll just use the one I made that measures 16 1/4 for a pillow top. My points all match so I'll use it for something.
The administrator has disabled public write access.

Month 1 The Halo Star Block 08 Jan 2017 14:55 #139181

Beautiful fabric choices !
The administrator has disabled public write access.
The following user(s) said Thank You: Renata

Month 1 The Halo Star Block 08 Jan 2017 12:48 #139175

  • Renata
  • Renata's Avatar
  • OFFLINE
  • Posts: 2673
  • Thank you received: 260
durstgirls wrote:
I just finished mine and my question is did Sue mean 16 inch finished when the entire quilt is done or did she mean 16 inch finished after the month 1 project was done? Mine is measuring 16. 25 inches so I don't know if I can 1/4 inch too big or a 1/4 inch too small. I have had an issue in the past with the printer not printing the correct size. On page 23 is the inch block to check your printer with. In the past I had to set my printer to 125% to print correctly. For this particular pattern my printer did print the 1 inch correctly. That could certainly be your problem.

On page 7 of her first month instructions for the Halo Star Block (first line at top of page), Sue states that it is a "16-inch square (finished size)." This means that your block should now measure 16 1/2 inches (after the month 1 project is done). Hope this helps.

The administrator has disabled public write access.
The following user(s) said Thank You: bbquiltmaker

Month 1 The Halo Star Block 08 Jan 2017 12:46 #139174

The block is 16" finished when sewn into the quilt--it is 16.5" raw edge to raw edge after you make the block in this first month. Check your printed patterns--units 6, 19, and 12--see page 9 of the pattern for a guide. Measure the solid line of these three units across the top of the block. Unit 6 and 12 should measure 5.75" each, Unit 19 should measure 4.5". Those 3 units measure 16" when sewn together. Be sure you are measuring the solid sewing line, not the outside (raw edge) line. I hope this helps.

bbquiltmaker.blogspot.com
North Alabama, USA
"I am a part of all that I have met" A. Lord Tennyson
Last Edit: 08 Jan 2017 16:09 by bbquiltmaker.
The administrator has disabled public write access.
The following user(s) said Thank You: JudithA, durstgirls

Month 1 The Halo Star Block 08 Jan 2017 12:37 #139173

  • durstgirls
  • durstgirls's Avatar
  • OFFLINE
  • Posts: 112
  • Thank you received: 67
Very pretty. I would still like an answer from Sue Garmen on whether the Month 1 block should measure 16 finished with the halo is in the entire quilt or 16 when the block is finished. I still think it is a bit confusing.
The administrator has disabled public write access.

Month 1 The Halo Star Block 08 Jan 2017 12:30 #139171

  • durstgirls
  • durstgirls's Avatar
  • OFFLINE
  • Posts: 112
  • Thank you received: 67
I just finished mine and my question is did Sue mean 16 inch finished when the entire quilt is done or did she mean 16 inch finished after the month 1 project was done? Mine is measuring 16. 25 inches so I don't know if I can 1/4 inch too big or a 1/4 inch too small. I have had an issue in the past with the printer not printing the correct size. On page 23 is the inch block to check your printer with. In the past I had to set my printer to 125% to print correctly. For this particular pattern my printer did print the 1 inch correctly. That could certainly be your problem.
The administrator has disabled public write access.

Month 1 The Halo Star Block 08 Jan 2017 11:32 #139167

  • Renata
  • Renata's Avatar
  • OFFLINE
  • Posts: 2673
  • Thank you received: 260
Renata wrote:
For anyone still having a hard time getting a 16 1/2" block and having trouble getting a perfect 1/4" seam... I took a slightly different approach to getting the 1/4" seam right and it seems to be working so far.

Rather than testing the accuracy of the 1/4" seam in the more conventional way, I took one of the paper templates, cut on the line for the seam allowance and then used that as my test under the machine. I placed the needle on the paper seam line, placed a "purple thang" to the right butted up against the template, then stitched on the seam line of the paper template. If stitching stayed on the stitching line, then my purple thang was properly aligned and because I used the actual template, I knew I had a perfect 1/4" seam. Instead of the purple thang, you can use post-its or tape.

While I have not put all the blocks together to finalize the star block, ALL of my points are aligning perfectly so far.

I finished the block. Here is the sample using the template as a guide for the 1/4" seam described above.
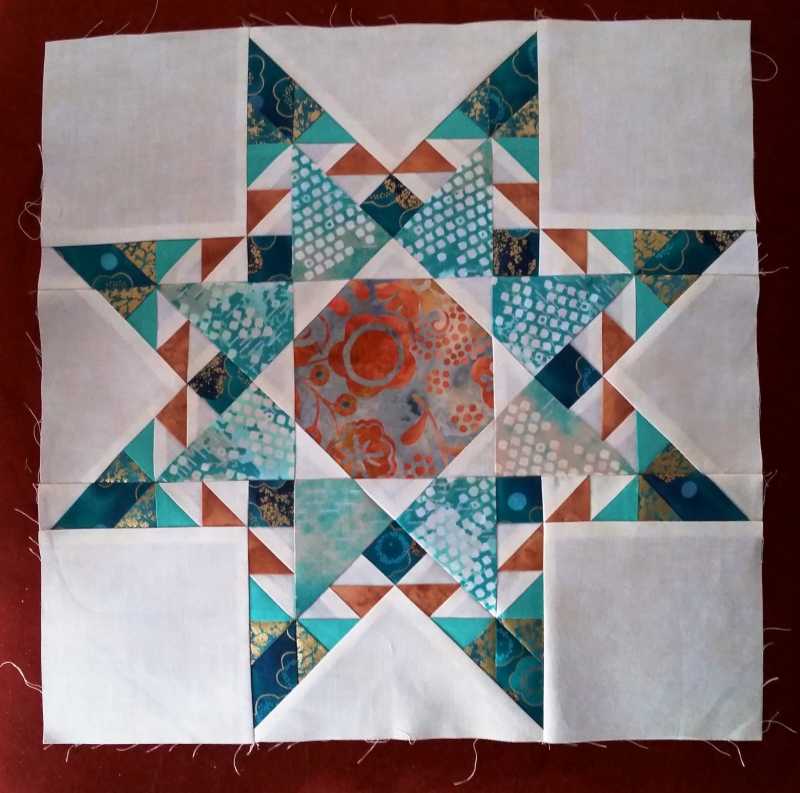
HaloMedallionSample2.jpg


In addition to using the template as a guide to determine the perfect ¼”, I followed Sue Garman’s instruction on putting the individual blocks together and pulled paper off the back of those. However, I did not pull paper off the back of the blocks that did not require further assembly after the paper piecing was done (the middle block and the four corner blocks). When it was time to actually sew the blocks together in vertical rows, I used Wonder Clips to “pin” NOT the seam where I was going to sew the two blocks together, but on either side to keep the two blocks together and straight. I used pins where needed along the side where the blocks were to be sewn together and I made sure the seams kissed perfectly, then I sewed a basting stitch across (3.5 stitch length), on the seam line of the paper template, took off the Wonder Clips, checked to make sure everything looked good; if it did, I sewed over the same seam with a 2.0 stitch length.  I took the papers off and pressed my seams. All of my vertical rows measure exactly 16 ½”. This worked for me much easier than with my first sample (Christmas table topper):
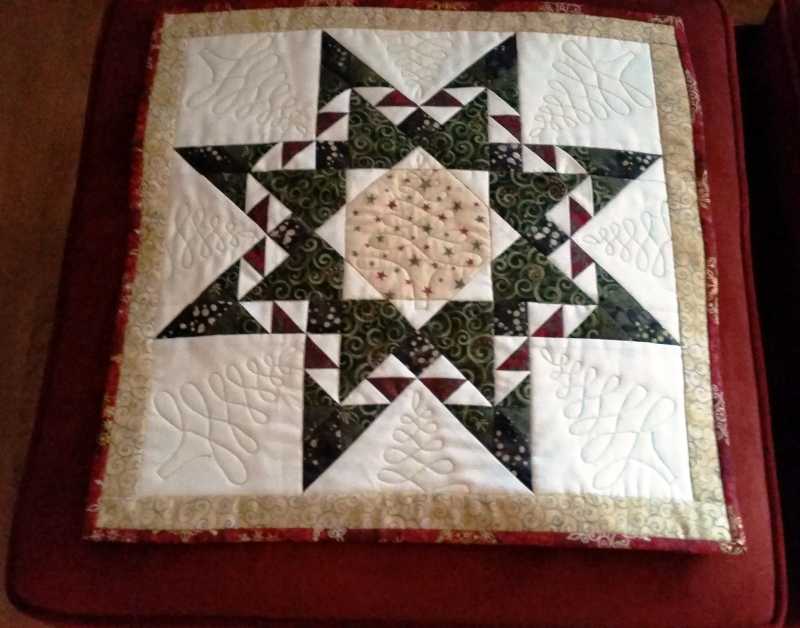
XmasHaloMedallion005.jpg


With the first sample, my block finished at 16" rather than 16 1/2". Since I paper-pieced and sewed exactly on the seams, I concluded that my problem was not having a perfect 1/4" seam. Using the paper template to set the 1/4" seam on my machine made the whole process a lot easier. Now I'm ready to move on to making the actual halo medallion block! My samples were all made with scraps. Here's my fabric selection for the BOM:

015.jpg

Last Edit: 08 Jan 2017 11:52 by Renata.
The administrator has disabled public write access.

Month 1 The Halo Star Block 08 Jan 2017 05:07 #139160

  • JudyFN
  • JudyFN's Avatar
  • OFFLINE
  • Posts: 81
  • Thank you received: 30
Beautiful color choices. Your notebook looks so well organized. Good on you!
The administrator has disabled public write access.

Month 1 The Halo Star Block 07 Jan 2017 17:59 #139155

  • ladyquilter
  • ladyquilter's Avatar
  • OFFLINE
  • Posts: 754
  • Thank you received: 37
It's beautiful Barbara!

aka ladyquilter

Troutdale, OR
<!-- m --><a class="postlink" href="www.sweetpeaz.com/wordpress">www.sweetpeaz.com/wordpress</a><!-- m -->
The administrator has disabled public write access.
The following user(s) said Thank You: bbquiltmaker

Month 1 The Halo Star Block 07 Jan 2017 17:56 #139154

Here's mine so far, prepping for a small group class tomorrow. I'll demo the last two units then show how to put the final row together. I'm at 16.5"
Attachments:

bbquiltmaker.blogspot.com
North Alabama, USA
"I am a part of all that I have met" A. Lord Tennyson
Last Edit: 07 Jan 2017 18:03 by bbquiltmaker.
The administrator has disabled public write access.
The following user(s) said Thank You: JudithA, Pemela

Month 1 The Halo Star Block 07 Jan 2017 17:06 #139151

  • sewengel
  • sewengel's Avatar
  • OFFLINE
  • Posts: 606
  • Thank you received: 173
I will be putting mine together tonight, fingers crossed for 16 1/2". Will post pictures if successful.

Sharon in, dang its cold!!!, Colorado
The administrator has disabled public write access.
Time to create page: 0.271 seconds
Powered by Kunena Forum