 0
0
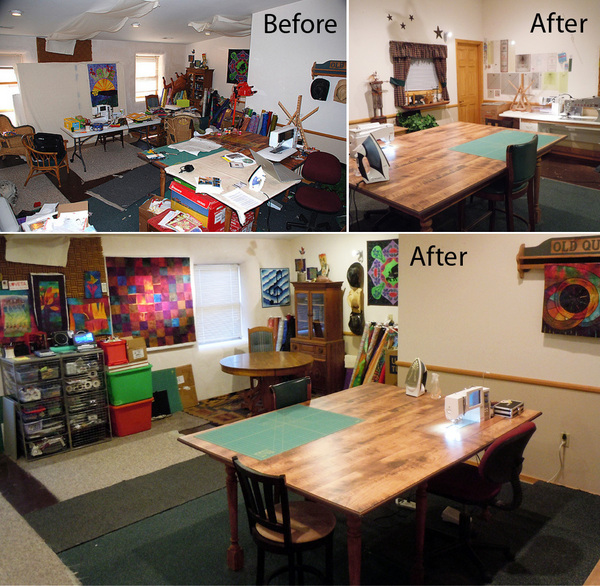
Talk about weekend fun! I finally dug into the dingy dungeon I call my sewing studio. The room is large, but has no closets so just about everything was piled either on a flat surface or the floor. Here's what I did in two days to get myself back on track with having a functional/organized space.
1. I decided to claim the space as a sewing room. There were about 9 chairs in the room leftover from TQS taping production meetings over 18 months ago. A folding table provided flat surface, but took up space and it was essentially useless because it was covered with piles of 'stuff'. Stored in this room were tubs (TQS time capsules), production lamps and stands, and various electronics scattered about. Also in attendance were letters, cards, and other assorted mail. Goal - remove everything that did not pertain to my tasks in this room - only sewing related items could remain.
2. Each and every item had to be touched and placed in an appropriate place and labeled. In order to have those places, I purchased two Elfa wire basket towers and a variety of tubs and small containers in which to organize my sewing necessities. I also got a P-Touch Labeler. With back-to-school supplies in abundance right now it was easy to find containers such as pencil boxes, plastic shoe boxes and other organizational containers for a buck.
3. Items were categorized. Here's how it is sorted.
Cutting tools - a container for scissors and a container for rotary cutters and blades
Labeling supplies
Adhesives - tapes of all sorts, spray baste, glue stick, glue, etc. (Not fusible web)
Pins and Needles - includes machine and hand needles, strait pins, safety pins, push pins, and even needle threaders
Drawing supplies - includes paper, a small box for regular pencils (includes erasers), a small box for pens, one for specialty pencils (white, yellow, etc), and another for sharpies of all colors. This also included sharpeners.
Another drawer is for specialty sewing items. This includes those strange set of templates (double wedding ring), and your assortment of funky, rarely used tools.
Irons, craft irons, teflon ironing sheets, starch.
Additional cutting mats are stored behind the wire bins.
There is a drawer for embellishments and another drawer for all things embroidery, including stabilizers, embroidery cds.
There is a drawer for sewing machine accessories - and each machine I own has it's own separate box for its own particular items.
4. Wall space is for design walls ( I have a large design wall and a small design wall), storing plexiglas rulers, and bulletin board space for fun things and memorabilia.
5. Find a place for tools. Every sewing room needs the basics: hammer, nails, screw drivers, pliers, etc.
6. Product on rolls. Freezer paper, large stabilizers, steam-a-seam 2, etc. all live together. If it's a product on a roll or bolt too large for a bin, they are all in the same area.
7. Fabric and batting: I'm not happy with my fabric storage - it's on open shelves, but at least it's in one place (we'll that's not true either because I have an entire store room of fabric at my house - not at the studio).
8. Thread: I have one very huge problem. The threads (hundreds of spools) are in containers. I must find a better way to organize them for easy access. That's my next big project. I think I'll give Libby Lehman a call.
I'll be the first to say it's still not great. But it's functional for me. Someday I'll have a space with built-in cupboards and counters, but that's a luxury most of us don't have - so we "make do" with what we've got. And lest you worry about Skippy, rest assured he has a home and can come out to play anytime. What is your best organizational tip?






.jpg)
