0

Chapter 8: Thread Delivery System | Superior Threads

Dr. Bob of Superior Threads is at it again with great advice on how to properly thread your machine through the thread delivery system.  You'll learn the best way to manage your thread whether you use a cone or a standard spool.  Bob's advice will make you successful when working with all the different threads available to you.  To watch the latest video, click here.

And for a bit more fun, Superior Threads has a new line of fabulous silk thread and 3 Lucky winners are going to try it out for free. Three winners will each get to choose 5 spools of 220 yard silk thread in the colors they want.

Click here to see all the colors.


  0

Linda French, is a Gammill longarm quilter extraordinaire. Linda's quilts have taken Best of Show in Knoxville, the Midatlantic Quilt Festival, and the Machine Quilters Showcase as well as many other awards. For TQS she is sharing the story of how she became a quilter and also gives insight into her process for designing one of her most celebrated quilts, Circles of Life. You'll want to read every word and examine every stitch, as TQS features, Linda French

You can visit Linda's website at Longarm Finishing TouchesThank you Linda for sharing your story.

Click to play this Smilebox slideshow


Linda French

I was born and raised in a NJ suburb, traveling south to the University of North Carolina where I graduated in Nursing.  I worked in Intensive Care and Pediatric Emergency Services for the next 30 years.

I married in 1978, and to get to know my mother-in-law better, I visited her every Wednesday morning for coffee.  During these visits, she pulled out a box of quilt blocks she was working on in a beginning sampler class.  She had such enthusiasm while showing me the blocks, that I thought I would give it a try.  I signed up for a class at a technical institute in NC (all handwork).

In 1981, after our 1st daughter was born, we moved to Dayton, OH where I started teaching beginner quilt classes.  I went to the charter meeting of the Creative Quilters Guild where I am still a member today.  In 1983, we were transferred to Melbourne, Australia for 3 years, where our youngest daughter was born. While living in Australia, I taught quilt classes and joined the Waverly Guild.  I made wonderful friends there.  The first quilt that I took graph paper out and designed myself was for Susan, as I was preparing to leave the country and say goodbye.

Upon returning to the USA, with 2 little ones in tow, we moved to Centerville OH where we still are today.  While working in pediatrics and raising two girls, I quilted every opportunity I could.  At this point, almost all my work was done by hand, even the piecing. Then I suffered an arm injury that put my arm (thumb to shoulder) in a cast for 2 months.  I had no use of my hand, and this total withdrawal from quilting was unacceptable.  So I called a group of my quilting friends, and they came over armed with rotary boards and cutters.  They cut squares (a lot of them) from a pile of fabric I provided.  I spent the next couple of months as I went tough Physical Therapy to get the use of my arm and hand back, working with those squares, learning about gradation, watercolors, and just playing with color.  As miserable as my recovery was, it was also a blessing in disguise, for it started my transformation into design, color and as quilters say “jumping out of your box”!

A couple of years later, a new neighbor moved in.  Margaret is a mural artist who has done murals on the walls of homes.  We became good friends and she would frequently visit, look at my neutral walls, and comment, “you need more color in your life”.  A fter painting all my walls, I had an even greater respect for how color changes everything.  I have, and will always love traditional quilting, adding color and design to give it more excitement.

I am currently retired from Nursing (and from helping my husband run a corporation).  Both of my daughters are married (no grandchildren yet!). 

After retiring, I met Doug and Martha from A Touch of Thread at a quilt show and purchased my longarm. I fell in love with machine quilting.  I spent most of the first year doodling and playing with feathers. The freedom of freehand was addicting.

I started Longarm Finishing Touches LLC after purchasing the Gammill (Statler) and began doing quilting for customers.  Most of my customers came to me for custom work and my freehand feathers.  So, most of the quilts I did had more freehand on them than computerized quilting.  My specialties are feathers and background filler designs.  I love doing tiny feathers.  My key to success – Play a Lot.

I don’t feel I have a particular style to my work.  I find inspiration from anywhere.  A photograph from a trip to Hawaii was the inspiration for the Penguin quilt.  Yes, the penguins are a warm water species from Hawaii.  (That was why I put the flowers in the sky, but most people believe it looks like snow!)

Marblemania’s inspiration moment was a TV commercial.  Our guild challenge was “lesser known holidays”.  Members drew their holiday out of a basket, and had to make a wallhanging about it.  I drew “Knuckles Down Month-In Celebration of the Game of Marbles”.  I admit I was stumped for a while, until I saw an M&M commercial one evening and got the idea.  I didn’t know how to do perspective, so I went to the library and took out a couple of books – drew the room, then added the marbles.   It was my first comical quilt I have done and it was a lot of fun (once I got the idea!)
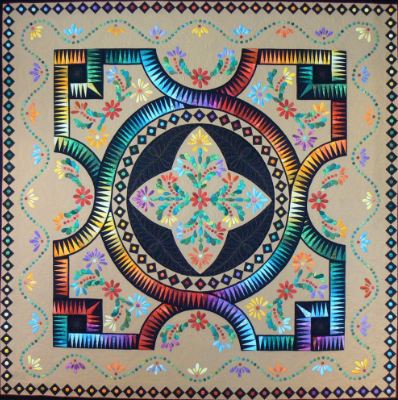
2999_linda_french.jpg“Circles of Life” started before I owned a longarm.  After seeing a black and white picture of an old window from a historical source, I was intrigued by the way the curves came together to form a circle.  So I drafted one quarter of the basic outline (took all day) and decided to make a quilt with it.  When designing the quilt, I used a design as you go methodology.  When I started sewing, I had NO idea what the finished quilt would look like.  I started with the space creating the circle and decided to use a sawtooth pattern.  After drafting the sawtooth I couldn’t make a decision on the color, so I thought I would try using all of them.   I took my stash one evening and put all of it on the living room floor.  Sitting in the middle, I started laying out all the fabric into a color wheel.  Then I started pulling towards me the colors that I liked until I had a circle that graduated around the color wheel.  I will admit, I was up late that night and my husband would walk by shaking his head.  After the fabrics were chosen, I had to number them to keep them in order.  On the quilt it is not a circle, but a series of arcs that come together to make the circle, so there are a lot of separate pieces. Keeping the colors in order was a challenge. The biggest OH NO moment I had was while constructing this part. I didn’t stop to think that the colors had to meet at the correct color to complete the circle.  With ¼ to go, I did a lot of manipulating of the colors to get them to match (if that didn’t work, I was starting over!).  Today I can’t find which area was the problem.  After finishing the sawtooth areas, I planned to appliqué the pieces to a background (which I hadn’t picked out yet).  To make this more stable, I applied bias to the edges of the pieces in black, which outlined the colors nicely.  The next few weeks were spent trying to find a background color.  After accomplishing that; I appliquéd the body of the quilt. It was a challenge keeping it square.   Once this was done I tackled the center.  I sketched a lot of options and threw a lot of basketball shots into the trash can.  After the center appliqué was completed, the rest of the quilt design became easier, for the designs primarily came from what was already done. 

Then came the border. Most people (including instructors) that saw the quilt at this point told me to quilt and bind it, that it didn’t need a border.  But I just felt it needed more.  I did not like the look of a vine around the quilt, so I changed it to the small circles.  It created the same effect, without the harsh line.  Adding the circles in the black squares was last – and the difference before and after even surprised me.  It was worth all the stitching to add them. 

For me, design as you go gives you the flexibility to allow the quilt to develop.  It is more exciting as you go to watch it grow, and encourages you to play with options which is not only the fun part, but you learn a lot along the way.

In the entire process of making this quilt, I only had to purchase one piece of fabric (other than the backing).  All of the fabrics in the color wheel were from my stash.  I purchased the background, a Kona Cotton.  I keep in my sewing room a bolt of black and white, so I had enough of the black to complete the project.

I had only owned my longarm about 1 year when I loaded this quilt.  I disconnected the Statler for I wanted every stitch on this quilt to come from me.  I started with the feathers, and thought it would be fun to feather them too.  Although I did test a couple of options on a practice piece one afternoon, did not decide what went into the space until I reached it.  I still work that way today.

The background filler in the corners, the swirls, was created while doodling one evening.  I do use a stitch regulator and for detailed swirls, circles, etc, I increase the stitches per inch for a smoother curve.

Very little marking was done on this quilt.  I used a purple air erasable marker in the small designs in the center and four corners area as I reached them.  I did not need to mark the vine of the feather border, except where it curved over a flower, which I marked with the air erasable as I reached it.  No feather was ever marked on the quilt.  For the feathers in the small triangles, I marked the vine by using a circle template. 

The entire process for making this quilt took 2 ½ to 3 yrs.  Most of this time was spent looking at what I’d accomplished so far and deciding what to do next.  For me, the joy was in the process.  I enjoyed creating this quilt so much, that I was sorry to see it completed.

For myself and others, I recommend creating a quilt for yourself, based on your likes, strengths and willingness to experiment and play.  If you do this, your end result will be what you like.  Do what you love, please yourself first, then share the results with the world.  Enter a show.

Awards for Circles of Life:

Best of Show: AQS Knoxville 2009

Best of Show: Midatlantic Quilt Festival 2010

First Place Solo Artist: MQX Rhode Island 2010

Best of Show: Machine Quilters Showcase 2010

Second Place Mixed Techniques: Quilt Odyssey 2010

First Place Mixed Techniques: NQA 2010

Best Machine Quilting, track mounted: NQA 2010

Awards for Marblemania:
Honorable mention: NQA 2010


  0
iPhoto

Have you ever had that piece of fabric that just doesn't work out for you?  Maybe the color is a bit off, or the design isn't quite as exciting as you'd like.  What did you do about it? Did you add some paint? Did you take it for a tea bath? Did you stamp it's little heart out?

TQS wants to know, how do you make that fabric your own?


  1

Rachel ClarkTQS recently received a note from member, dmmollere, about our recent guest Rachel Clark.  It just shows how wonderful quilters can be.

"I have a great story about Rachel Clark. Our group puts on a quilt show every year in Ponchatoula, Louisiana. Mostly it is a free outdoor display of about 200 quilts hanging from the store fronts of our quaint little town. But we also have an indoor display with admission and have special local displays and usually the Hoffman Challenge quilts and other things. Our quilt show generates just enough money to put on the next one. We basically do it for the love of quilting. In 2005 when Hurricane Katrina came, we had to cancel the show. Even though it is in October, no one was ready for any type of event. We were all still recovering. So what to do in 2006? Our funds were almost depleted from planning the show for 2005. We asked our Louisiana born star Rachel Clark to come and be a part of our quilt show. She graciously came with classes and the most fabulous fashion show of her garments. And for free. What an amazing gift! The publicity paid off and we had a record attendance and have been able to continue our quilt show every year since then. The local merchants had a reception in her honor. The mayor came along with lots of local bigwigs. It was to show our appreciation for her wonderful support of our endeavor. She will probably remember this event. There is a local store with the most amazing collection of beads called Turquoise Coyote. She was very excited about this particular store. We are truly thankful to have had Rachel Clark as our benefactor. She made a difference."

You can see Rachel in Episode 703 – Tools of the Trade (Rachel Clark/Renae Haddadin).

  0

63_lorna_westfall.jpgMeet TQS Member Lorna Westfall (Lorna1021)
currently living in Schertz, TX, USA.


A video of Lorna’s quilts is available here:
daily-blog/106-website-features/13992-member-spotlight-lorna-westfall


When did you start quilting?

I grew up in Lakeside, California, which is just east of San Diego.  Mom taught me to sew, embroider, knit, crochet, etc, but I don’t remember any quilting.  It wasn’t until 1974, a couple years after high school, as I was getting ready to go into the Army that I picked up quilting.   I had to wait a couple months before starting in the Army so I took some adult education classes—fiber arts, quilting and guitar.  I didn’t get to finish the classes before leaving, but I was hooked on quilting.   For one of my first projects I started making a Rolling Stones quilt.  I couldn’t do any of this while I was in basic training but later when I started my advanced training in San Antonio, Texas, I brought my fabric with me and kept sewing away on growing quilt top.  Most of the fabrics I was using were chicken feed sacks from my great grandmothers, but I also used scraps from clothes and muslin.   I used cardboard templates and pieced and quilted it by hand.  The problem was I didn’t finish the class so was blissfully ignorant on what I was doing.  I had a blast making it.  I must have done okay because the quilt has been well used over the years and has held up amazingly well.  I have a picture of laying the blocks out on the floor of the open bay barracks I stayed in for those 4 months of school.  Then later the quilt is on the quilt rack taking up most of my dorm room.


Who were your biggest influences when you started?  Have you any new influences?

My only influence early on was from the few classes I took and what I could read.  My first book was Better Homes and Gardens Patchwork & Quilting.  I also started getting Quilter’s Newsletter and any other quilt magazines or books I could find.  While I was stationed in San Antonio in the mid 70’s, I saw an ad in a Quilter’s Newsletter magazine from someone wanting to start a quilting bee.  I responded to that and met several delightful ladies who took me under their wings and taught me much more about quilting. 

My grandmother quilted and encouraged me along the way.  She gave me a Rolling Stars top that she hand pieced so I hand quilted that.   My grandmother has also given me a pin wheel top that was hand pieced by her mother—I have the fabric for the backing and the binding but that remains one of my UFOs. 

In 2000 I moved to Eglin Air Force Base in the Florida.  That is when I joined my first quilt guild—Silver Threads in Fort Walton Beach.  I met some wonderful ladies and learned so much from them at the meetings and at Saturday classes.  It was an awesome experience.  I even spent a weekend at a quilt expo in Panama City and took a class with Janet Jones Worley (another UFO) and learned to machine quilt with Jan Wildman. 

While I was stationed at Vandenberg Air Force Base on the central coast of California, I belonged to the All-American City Quilt Guild in Santa Maria.  Again, great people and I learned so much from everyone.  This was my first introduction to small group bees.  We had a wonderful group of ladies that met, initially once a month and then later weekly.  We each worked on our own UFOs but I still learned so much from all of them.  

In the last couple years I have discovered quilting web sites and The Quilt Show.    I have learned so much from the shows, classroom work and from all the other members.


Did you move a lot because of the Air Force?  Is there a favorite place that you’ve lived?

I actually moved a fair bit even before joining the Air Force.  I lived in Texas and Wisconsin before settling in North Carolina for 12 years.  That is where I finally finished my undergraduate degree and went to medical school.  I joined the Air Force after I finished my Family Medicine residency in 1992 and have moved every 2-5 years since then.  I was at Edwards Air Force Base, California for 5 years then had the pleasure of living in northern Italy at Aviano AB for the next three years.  It was an hour north of Venice and amazing.   I loved getting to know the people and traveling to see so many things in Italy and beyond.  Next was Eglin AFB from 2000 - 2003 in the panhandle of Florida and then I was lucky enough to go back overseas to Lajes Air Base in the Azores.  This is a group of islands in the Atlantic about 700 miles off the coast of Portugal.  I was very excited to spend the 13 months there because that is where my father’s family is from.  I lived on Terceira, but spent several weekends on the island of Faial with cousins and a great aunt.  One thing that was memorable was that during festivals in the towns they created designs in the streets with flower petals and hung bright colorful quilts or blankets from the upstairs windows.  Since then I lived on the central coast of California for a couple years and now here in San Antonio, Texas.

I have been lucky and have had wonderful opportunities to experience so many areas of not only our own country but Europe as well.  I had a wonderful time in both Italy and the Azores.  I love to travel and explore new areas and would be delighted to have another chance to go back overseas.


How do you manage to quilt and sew when you are moving around?

Sometimes it wasn’t so much the moving as it was my school and work schedule.  During my Family Medicine residency my schedule was very hectic with crazy hours so instead of trying to make quilts, my daughters and I started making seasonal placemats with the goal of different ones for each month.  We really only finished about 4 sets.

The Air Force moves all of my household goods from place to place so dragging my sewing machine (I owned an Elna Super for 35 years!) and fabric stash around was really not a problem.  The biggest challenge came when I moved to Lajes on the island of Terceira.  It was a short tour (15 months) and I was limited to 1600 pounds of household goods.  Fortunately I didn’t need to bring furniture as they took care of that.  So my weight went to my sewing and quilting supplies, clothes and a few basic kitchen supplies and linens.  Here is a picture of my sewing machine, fabric stash and quilting supplies.  This was a big percentage of my total weight!  I packed in plastic bins to help organize my supplies and because I heard the humidity was so bad and mildew was a big problem.  I planned ahead for the projects I wanted to work on and brought everything with me.  I had started working on Roseville, a needle turn appliqué block of the month by Maggie Walker with the Silver Threads guild.  Though I finished several blocks and only have the center block to finish, that is another of my UFOs.  I also brought lots of red and green and white fabrics.  I wanted to make a Christmas log cabin for each of my 5 grandchildren.  I did finish all the tops and had 2 quilted by the time I left in 2004.  I now have two more grandchildren who I need to make a Christmas Log Cabin quilts for.


What are you working on now?

I have several projects going now.  I am trying to finish last year’s TQS BOM.  I have to do November’s flying geese border next. So I am making progress.  I am staying current with the two TQS BOMs this year.  I just finished quilting and binding a Hip to Be Square full size quilt.  I have made seasonal wall hangings for all but spring and I have the center blue bonnet appliquéd on and need to create borders get it to the right size.  Listening to Alex I got interested in neutrals.  I bought her book on the subject and made the pinwheels and stars from that, but enlarged it to sofa size.  That needs to be layered and quilted next.  There are several other UFOs or future projects that I have the fabric and pattern for, but not the time.


Are you in a guild now?  Which one?

I currently belong to the Alamo Heritage Quilt Guild here in San Antonio.  We are planning a quilt show for October 2010 so everyone needs to try to come and visit.


Do your daughters/grandkids quilt?  Did you teach them?

I was in medical school from 1985 to 1989.  During fall break in 1985, I worked with two of my daughters on quilts for them.  They helped pick out the fabrics, I sewed the tops together by machine and then during Christmas vacation we tied the quilts. Also one summer when my stepdaughter came to visit we started a quilt together.  I later finished that quilt for her first baby.  She has gone on to make quilts for the rest of her kids.  A few years ago, I was with one of my daughters and we were picking out fabrics for a quilt for her.  Her, then 5 year-old, son was also going through the store and picking out bolts of fabric.  “I like these, Grandma!”  He was so cute!  Finally we picked out a baseball print as the focus fabric and I let him pick out 20 fat quarters to go with it.  That weekend we made him a Turning Twenty quilt.  This last summer at 9 ½ years old, he came to visit me for week.  This time I let him pick out fabrics from my stash.  I cut with the rotary cutter, but I had him sew the blocks together in a nine patch and then I had him machine quilt it.  We just did this large zigzag/lightning bolt type, free motion pattern.  He did awesome and he was so proud of his small quilt!


Lorna’s Timeline:
1972 graduated high school (El Capitan High School, Lakeside, CA).  Went to a semester of college, took a year off to travel and then did another semester of college.
 
1974 joined the Army in order to get the GI Bill to pay for college. Trained as a dental lab tech (made dentures and crowns and bridges) and was stationed at Fort Sam Houston in San Antonio, TX
 
1977 got out of the Army.  Got married, started having kids.  Already had a year of college completed and used GI Bill to finish undergraduate school and pay for first year of med school. 
 
1983 Took 11 1/2 years to finally graduate from college (UNC-Greensboro, NC)
 
1985 - 1989 medical school -- UNC School of Medicine in Chapel Hill NC
 
1989 - 1992 residency in Family Medicine -- Moses Cone Family Medicine Residency Program, Greensboro, NC
 
1992 joined the Air Force because I wanted to travel.
 
20 1/2 years total service time includes Army time.
 
Currently in the Air Force, I am Director of Medical Services for the Air Force Medical Operations Agency.  We assist and advise the 75 Air Force clinics, hospitals and medical centers in execution of health care policy, providing day-to-day guidance and standardizing policy to decrease variance and improve the quality of care. I oversee business and clinical analysis, mental health, provision of medical care, quality, and case and disease management.
 
It has been a very windy path.  Oh and just got remarried May 2009!

  0

Our featured artist today is Linda French, Gammill longarm quilter extraordinaire.  Linda's quilts have taken Best of Show in Knoxville, the Midatlantic Quilt Festival, and the Machine Quilters Showcase as well as many other awards. For TQS she is sharing the story of how she became a quilter and also gives insight into her process for designing one of her most celebrated quilts, Circles of Life. You'll want to read every word and examine every stitch, as TQS features, Linda French

You can visit Linda's website at Longarm Finishing Touches.  Thank you Linda for sharing your story.

Click to play this Smilebox slideshow

Linda French

I was born and raised in a NJ suburb, traveling south to the University of North Carolina where I graduated in Nursing.  I worked in Intensive Care and Pediatric Emergency Services for the next 30 years.

I married in 1978, and to get to know my mother-in-law better, I visited her every Wednesday morning for coffee.  During these visits, she pulled out a box of quilt blocks she was working on in a beginning sampler class.  She had such enthusiasm while showing me the blocks, that I thought I would give it a try.  I signed up for a class at a technical institute in NC (all handwork).

In 1981, after our 1st daughter was born, we moved to Dayton, OH where I started teaching beginner quilt classes.  I went to the charter meeting of the Creative Quilters Guild where I am still a member today.  In 1983, we were transferred to Melbourne, Australia for 3 years, where our youngest daughter was born. While living in Australia, I taught quilt classes and joined the Waverly Guild.  I made wonderful friends there.  The first quilt that I took graph paper out and designed myself was for Susan, as I was preparing to leave the country and say goodbye.

Upon returning to the USA, with 2 little ones in tow, we moved to Centerville OH where we still are today.  While working in pediatrics and raising two girls, I quilted every opportunity I could.  At this point, almost all my work was done by hand, even the piecing. Then I suffered an arm injury that put my arm (thumb to shoulder) in a cast for 2 months.  I had no use of my hand, and this total withdrawal from quilting was unacceptable.  So I called a group of my quilting friends, and they came over armed with rotary boards and cutters.  They cut squares (a lot of them) from a pile of fabric I provided.  I spent the next couple of months as I went tough Physical Therapy to get the use of my arm and hand back, working with those squares, learning about gradation, watercolors, and just playing with color.  As miserable as my recovery was, it was also a blessing in disguise, for it started my transformation into design, color and as quilters say “jumping out of your box”!

A couple of years later, a new neighbor moved in.  Margaret is a mural artist who has done murals on the walls of homes.  We became good friends and she would frequently visit, look at my neutral walls, and comment, “you need more color in your life”.  A fter painting all my walls, I had an even greater respect for how color changes everything.  I have, and will always love traditional quilting, adding color and design to give it more excitement.

I am currently retired from Nursing (and from helping my husband run a corporation).  Both of my daughters are married (no grandchildren yet!). 

After retiring, I met Doug and Martha from A Touch of Thread at a quilt show and purchased my longarm. I fell in love with machine quilting.  I spent most of the first year doodling and playing with feathers. The freedom of freehand was addicting.

I started Longarm Finishing Touches LLC after purchasing the Gammill (Statler) and began doing quilting for customers.  Most of my customers came to me for custom work and my freehand feathers.  So, most of the quilts I did had more freehand on them than computerized quilting.  My specialties are feathers and background filler designs.  I love doing tiny feathers.  My key to success – Play a Lot.

I don’t feel I have a particular style to my work.  I find inspiration from anywhere.  A photograph from a trip to Hawaii was the inspiration for the Penguin quilt.  Yes, the penguins are a warm water species from Hawaii.  (That was why I put the flowers in the sky, but most people believe it looks like snow!)

Marblemania’s inspiration moment was a TV commercial.  Our guild challenge was “lesser known holidays”.  Members drew their holiday out of a basket, and had to make a wallhanging about it.  I drew “Knuckles Down Month-In Celebration of the Game of Marbles”.  I admit I was stumped for a while, until I saw an M&M commercial one evening and got the idea.  I didn’t know how to do perspective, so I went to the library and took out a couple of books – drew the room, then added the marbles.   It was my first comical quilt I have done and it was a lot of fun (once I got the idea!)

2999_linda_french.jpg“Circles of Life” started before I owned a longarm.  After seeing a black and white picture of an old window from a historical source, I was intrigued by the way the curves came together to form a circle.  So I drafted one quarter of the basic outline (took all day) and decided to make a quilt with it.  When designing the quilt, I used a design as you go methodology.  When I started sewing, I had NO idea what the finished quilt would look like.  I started with the space creating the circle and decided to use a sawtooth pattern.  After drafting the sawtooth I couldn’t make a decision on the color, so I thought I would try using all of them.   I took my stash one evening and put all of it on the living room floor.  Sitting in the middle, I started laying out all the fabric into a color wheel.  Then I started pulling towards me the colors that I liked until I had a circle that graduated around the color wheel.  I will admit, I was up late that night and my husband would walk by shaking his head.  After the fabrics were chosen, I had to number them to keep them in order.  On the quilt it is not a circle, but a series of arcs that come together to make the circle, so there are a lot of separate pieces. Keeping the colors in order was a challenge. The biggest OH NO moment I had was while constructing this part. I didn’t stop to think that the colors had to meet at the correct color to complete the circle.  With ¼ to go, I did a lot of manipulating of the colors to get them to match (if that didn’t work, I was starting over!).  Today I can’t find which area was the problem.  After finishing the sawtooth areas, I planned to appliqué the pieces to a background (which I hadn’t picked out yet).  To make this more stable, I applied bias to the edges of the pieces in black, which outlined the colors nicely.  The next few weeks were spent trying to find a background color.  After accomplishing that; I appliquéd the body of the quilt. It was a challenge keeping it square.   Once this was done I tackled the center.  I sketched a lot of options and threw a lot of basketball shots into the trash can.  After the center appliqué was completed, the rest of the quilt design became easier, for the designs primarily came from what was already done. 

Then came the border. Most people (including instructors) that saw the quilt at this point told me to quilt and bind it, that it didn’t need a border.  But I just felt it needed more.  I did not like the look of a vine around the quilt, so I changed it to the small circles.  It created the same effect, without the harsh line.  Adding the circles in the black squares was last – and the difference before and after even surprised me.  It was worth all the stitching to add them. 

For me, design as you go gives you the flexibility to allow the quilt to develop.  It is more exciting as you go to watch it grow, and encourages you to play with options which is not only the fun part, but you learn a lot along the way.

In the entire process of making this quilt, I only had to purchase one piece of fabric (other than the backing).  All of the fabrics in the color wheel were from my stash.  I purchased the background, a Kona Cotton.  I keep in my sewing room a bolt of black and white, so I had enough of the black to complete the project.

I had only owned my longarm about 1 year when I loaded this quilt.  I disconnected the Statler for I wanted every stitch on this quilt to come from me.  I started with the feathers, and thought it would be fun to feather them too.  Although I did test a couple of options on a practice piece one afternoon, did not decide what went into the space until I reached it.  I still work that way today.

The background filler in the corners, the swirls, was created while doodling one evening.  I do use a stitch regulator and for detailed swirls, circles, etc, I increase the stitches per inch for a smoother curve.

Very little marking was done on this quilt.  I used a purple air erasable marker in the small designs in the center and four corners area as I reached them.  I did not need to mark the vine of the feather border, except where it curved over a flower, which I marked with the air erasable as I reached it.  No feather was ever marked on the quilt.  For the feathers in the small triangles, I marked the vine by using a circle template. 

The entire process for making this quilt took 2 ½ to 3 yrs.  Most of this time was spent looking at what I’d accomplished so far and deciding what to do next.  For me, the joy was in the process.  I enjoyed creating this quilt so much, that I was sorry to see it completed.

For myself and others, I recommend creating a quilt for yourself, based on your likes, strengths and willingness to experiment and play.  If you do this, your end result will be what you like.  Do what you love, please yourself first, then share the results with the world.  Enter a show.

Awards for Circles of Life:

Best of Show: AQS Knoxville 2009

Best of Show: Midatlantic Quilt Festival 2010

First Place Solo Artist: MQX Rhode Island 2010

Best of Show: Machine Quilters Showcase 2010

Second Place Mixed Techniques: Quilt Odyssey 2010

First Place Mixed Techniques: NQA 2010

Best Machine Quilting, track mounted: NQA 2010

Awards for Marblemania:
Honorable mention: NQA 2010


  0

3009_sting_02b.jpg

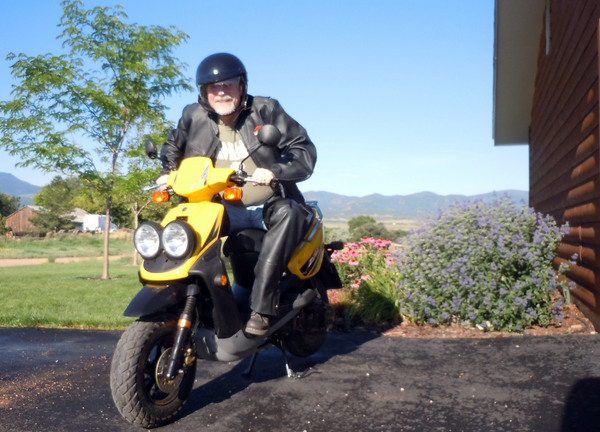
Talk about overkill - this much gear for a 50cc scooter?

Thanks for all the votes for naming my new scooter. It was very close between Wolley and Sting. Actually, Wolley got a few more votes than Sting. However, my vote gets a bit of extra weight (naturally) and I had many of my good British friends write to say that "wally" is a very derogatory word meaning nerd. I even looked online and sure enough slang "wally" is not nice. So, while Wolley (yellow spelled backwards) was very clever and we all liked it, I've decided to stay with Sting. 

Sting was suggested because it looks like a bee. Sting stuck with me because he is my favorite male music artist and his song "Fragile" is my favorite song of all time.

So - me and Sting - the dynamic duo cruising through town - and NO, I wont' be wearing my leather chaps and jacket when heading down to the office.

  0

Judy Jeroy had a dream. Inspired by a love of America's beauty she wanted to see it come to life in needlework. The National Tapestry is the culmination of that dream. It has been a work in progress for the past four years. According to the Embroiderer's Guild of America website:

"Five panels were designed and painted on #18 count mono canvas. Each panel was assigned a coordinator to facilitate the finishing. No techniques were excluded in the stitching of each panel, which represents certain geographic features and indigenous objects, animals, birds, and plants throughout the country. To date literally thousands have stitched on the five panels."

The panels will travel around the country over the next year. Here are some upcoming locations:

Sep 3 - 10, 2010: San Francisco Marriott Marquis
Oct 23 - Feb 13, 2011: Neville Public Museum of Brown County, Green Bay, WI
Apr 15 - May 29, 2011: William M.Costick Activities Center, Farmington Hills, MI
Sep 8 - 16, 2011: The Naples Grande, Naples, FL
Oct 5 - 8, 2011: Rocky Mount Arts Center, Rocky Mount, NC

To learn more, visit the Embroiderers' Guild of America website.

Click to play this Smilebox slideshow


  0

3005_sewingtable.jpg

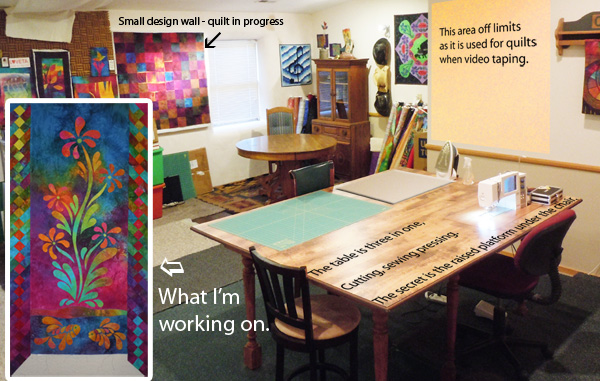
This is a follow up to yesterday's post about my new "clean" sewing studio. 

There were suggestions that I utilize what's left of my wall space for threads - however, the available wall space is reserved for quilts when we use the room for video taping. There is a larger wall behind where I sit and sew (if you watch Bernina videos, you'll see there is always a quilt behind Nina) so I can't utilize that area for organizational space. Also, it's deceptive, but there is not much room between the table and the wall (see the photo below). Move the table you say? We'll no - and here's why.

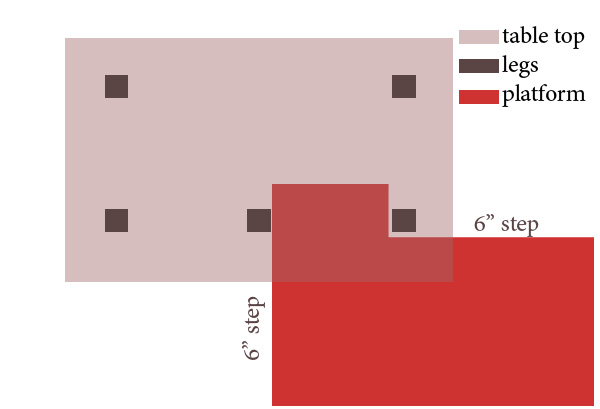
The very cool sewing table (custom made by Justin and myself) stands at cutting and pressing height. However, notice the chair in front of the machine. It is at the right height for sitting and sewing. The secret is a raised platform for the chair. The platform is built to extend under the table in front of the chair and it extends to the right of the table and chair and butts to the wall - so this determines where the table must be. If I were to move the table away from the wall - I'd also have to move the platform thus creating a gap that would be problematic. The right and bottom of the platform (see the illustration above) butt up to the wall.

The only thing that you have to get used to are the steps leading onto the platform, but stepping up and down becomes second nature in a short time and you totally forget about the steps. WARNING: If you choose to utilize this design with a platform, you must pay attention the the steps.

I love the design, especially for studios located in smaller bedrooms, because you could have the table in the center of the room rather than being pushed up to a wall. There is lots of storage space under the table. I plan to purchase more Elfa wire baskets for under the table so I can better utilize that space. Include a couple of bistro chairs for visitors.

Any carpenter could build something like this. The two most important measurements are:

1. your preferred cutting and pressing height

2. your comfortable height for sitting and sewing. The platform height is the difference between the two - in most cases - 5" to 7".

Yes, the clean studio got me itching to sew - so I took an hour and worked on multi-colored seminole borders for a project that I've had waiting in the wings.

P.S. You might be interested to know that the legs for the table are bannisters and the top is wood flooring on top of a plywood base. The edges are beveled and if I made another, I would slighty round the corners to better protect the quilts when quilting.

3005_sewingstudio_text.jpg

  0

3004_dale.jpg
Photo by Mary Kay Davis

Curves got you scared? No need to fear! Join us in Episode 704 with Dale Fleming for a show that will have you approaching circles and curves in a whole new way. After viewing Dale's innovative "6-Minute Circle" technique, you'll want to try a few of these circular design elements in your next quilt project. In addition, Dale's tips for using large-scale prints will make you think twice about passing up those versatile fabrics at your local quilt shop. With all of this great info, helpful tips, and some tasty treats, this is a must-see episode.  Click here to watch the show.