• Home
  • Daily Blog
  • Join Free
  • My Account
Login
The Quilt Show on Facebook The Quilt Show on YouTube The Quilt Show on Pinterest The Quilt Show on Instagram
  • Home
  • Watch Shows & DVDs
    • Current Show
    • Search Shows
    • Show List
    • Free Shows
    • Featured Guest DVDs
    • Behind the Scenes
    • Slideshows
  • Learn Classes & BOM
    • Classrooms
    • -- Downloads for Classes
    • -- Search Classrooms
    • Block Of The Month-BOM
      • BOM 2021
      • BOM 2020
      • BOM 2019
      • BOM 2018
      • BOM 2017
        • BOM Kits
      • BOM 2016
      • BOM 2015
      • BOM 2014
      • BOM 2017 Videos
      • BOM 2016 Videos
      • BOM 2015 Videos
      • BOM 2015 Group/Photos
      • BOM 2014 Videos
      • BOM 2014 Group/Photos
      • All BOMs
    • Teachers
    • BERNINA Videos
    • TQS Show Techniques
    • Projects
    • -- Blooms for Julie
    • -- 3...2...1... Go! with Sue Garman
  • See Quilts Quilts & Slideshows
    • Quilt Gallery
    • Quilt of the Day
    • Zoom Quilts
    • Member BOM Quilts
    • Show & Tell Quilts
    • Puzzles & Games
  • Connect Quilter Community
    • TQS Community
    • Events
    • Forum
    • Member Groups
    • Alex Anderson
    • Ricky Tims
  • ShopProducts & Kits
    • Purchase Star Membership
    • Redeem Gift Certificate
    • Redeem 1 Month Coupon
    • Free Basic Membership
    • Visit Our Store
    • -- Purchase Gift Certificate
    • -- The Quilt Show DVDs
    • -- BOM 2019 Kits
    • -- Apliquick Tools
×

Message

Please login first

Please login first

Daily Blog

Tutorial: Make a Fabric Easter Basket

Details
Newsletter
07 April 2017
  •  Print 
  • PDF PDF
  1
fShare
Tweet
Melissa Mortenson, founder of the Polka Dot Chair Blog, came up with the idea to make small Easter baskets out of fabric so that she could have them with her when her family was away from home over the Easter holiday. Now you can make them too using her tutorial at WeAllSew.
 
 
Add new comment

The Disappearing Art of Making Scissors by Hand

Details
Newsletter
07 April 2017
  •  Print 
  • PDF PDF
  10
fShare
Tweet
Ernest Wright and Son Limited might be the last factory in Britain still making scissors by hand. In 2015, it looked like they were about to close, but then a video about the scissors went viral and orders came flooding into the shop.
 

5 comments

Featured Libby Lehman Auction Quilt "Windfall"

Details
Newsletter
05 April 2017
  •  Print 
  • PDF PDF
  2
fShare
Tweet
 

"Windfall" - Year: 2000, Size: 87" x 87"

Libby and her husband, Lester, have decided to offer her remaining quilts in an online auction, comprised exclusively of quilts created by Libby. The opportunity to own one of her quilts has now arrived. There will not be another opportunity to acquire one of Libby’s quilts.


Libby described “Windfall” simply as, “It’s big.” She said, “I wanted to make it about 50”, but it ended up 87” because “the quilt talked to me and said, ‘I want to be Big’.” So she just let it be Big. Libby always encouraged her students to “listen” to their art and to not be afraid to follow where it leads. She also liked to listen to music while quilting and was known to do a little line dancing between quilt steps if she had country western or Jimmy Buffet music playing. Libby used two of her favorite colors in making this quilt, orange and green, but then again, her favorite colors change from time to time. You can’t help but wonder - was that Libby’s choice or the quilt’s? 


The online auction closes on April 12 at 8:00 PM CDT.

To view and bid on the quilts visit: www.libbylehmansquilts.com.

 
Add new comment

Anna & G on the Road: Quilt Shop Hop Roadie Style

Details
Newsletter
05 April 2017
  •  Print 
  • PDF PDF
  6
fShare
Tweet

One of the nice things about not having an agenda on the road is you can change your mind. And, because we don't mind boon-docking, along with staying at RV parks/State parks, it allows us to be more flexible. Our intention was to stay in Tucson for four days, but due to weather up north (ie.snow!), we decided to stay four more days. This meant I was able to visit a second quilt shop! Our goal is to feature independent quilt shops to do our small part in supporting the industry.  With that said, if you see anything you can't live without, you can call the shop up which is just what my friend Linda did when she saw the adorable Mouse Quilt in the Christmas Goose Quilt Shop video!!

Our first Tucson quilt shop was The Cactus Quilt Shop which opened its doors in 1997!

This shop had so many wonderful items as seen on the Quilt Roadies video and I did drop a pretty penny there. Truly one of the special things about The Cactus Quilt Shop is that owner Nancy is a pattern designer and her patterns showcase the Southwest. Also, she has reproduced a quilt made by a Goldie Richmond who ran a trading post in Arizona. The quilt depicts the daily life of the Tohono O'odham people.  


Click to play this Smilebox collage


The second quilt shop we discovered was The Quilt Basket, a combination quilt shop and BERNINA Sewing Center, also located in Tucson, Arizona! How lucky are we...or rather me!!! LOL. This shop is equally lovely and if you are a wool fan...oh boy have they got your number! Not only a wonderful selection of fabrics, but wool and wool inspired patterns...and a HUGE amount of Sue Spargo's thread!!! You'll have to check out the Quilt Roadie video for an up close and personal look.

We will continue on our journey to bring you a closer of view of the quilting world on the road! Enjoy!!

Click here to watch Anna's Quilt Roadie videos.

Click here to visit Anna's blog.

Click to play this Smilebox collage
4 comments

The Women of World War I in Photographs

Details
Newsletter
05 April 2017
  •  Print 
  • PDF PDF
  5
fShare
Tweet

When we think of women in wartime, we often think of Rosie the Riveter during WW II, but women had been participating in the wartime effort many years prior to the creation of the iconic bandana wearing woman. That is not a sewing machine she's using...

Click here to see more photos of amazing women.

(photo: unwritten-record.blogs.archives.gov)

Add new comment

Tutorial: How to Sew Easter Napkins

Details
Newsletter
05 April 2017
  •  Print 
  • PDF PDF
  1
fShare
Tweet

Are you hosting the Easter brunch this year? Create the final touches for your Easter table with this quick and easy napkin tutorial. These napkins, from Melissa Mortenson at WeAllSew, are self-binding so you can quickly whip up a bunch of them for a very special Easter occasion.


Add new comment

Take a Tour of Cotton + Steel

Details
Newsletter
05 April 2017
  •  Print 
  • PDF PDF
  1
fShare
Tweet


Tracy Mooney of Generation Q Magazine takes us on a tour of the Cotton + Steel booth at quilt market with two of their designers, Melody Miller and Sarah Watts. They give us a peek at the latest fabrics lines and two stunning "Cotton + Steel" BERNINA sewing machines that you can order today.


1 comment

Fabulous Curved Piecing Tips from Victoria Findlay Wolfe - Use Only 3 Pins!

Details
Newsletter
05 April 2017
  •  Print 
  • PDF PDF
  5
fShare
Tweet
TQS is all about learning, and as we celebrate our 10-year anniversary we want to share some great memories and some great tips for putting together your quilts. This clip from Show 2002: Look Out! Double Rings and Curves Ahead has Victoria Findlay Wolfe demonstrating a great technique for piecing curves using only 3 pins! And you'll never forget "floppy toppy" again.
 

5 comments

Jinny Beyer's Memory Match Game: 4/2/2018

Details
Newsletter
03 April 2017
  •  Print 
  • PDF PDF
  3
fShare
Tweet

Have you any idea what this block is called? Jinny's Game will help you learn.

Add new comment

Design to Quilt: (Week 10) Elements of Design-Space

Details
Newsletter
03 April 2017
  •  Print 
  • PDF PDF
  22
fShare
Tweet

Creating the illusion of depth and spatial reality in your work is not difficult, if you know and understand the magic that key players can perform. Think of depth in a quilt as the ingredient that makes a grilled cheese sandwich so delicious. What's not to love?  The sandwich is crispy, chewy, creamy, and salty all in the first bite. The basic ingredients are white bread, a cheese that melts easily, and butter or margarine. This works and probably makes for a good sandwich. But, what if you swapped out the bread for a sourdough?  What if you included a mixture of different types of cheeses? How about adding a piece or two of bacon to the mix? Now the sandwich is more interesting on a whole new level. It is still a grilled cheese, but something that stands out from 'the usual'.

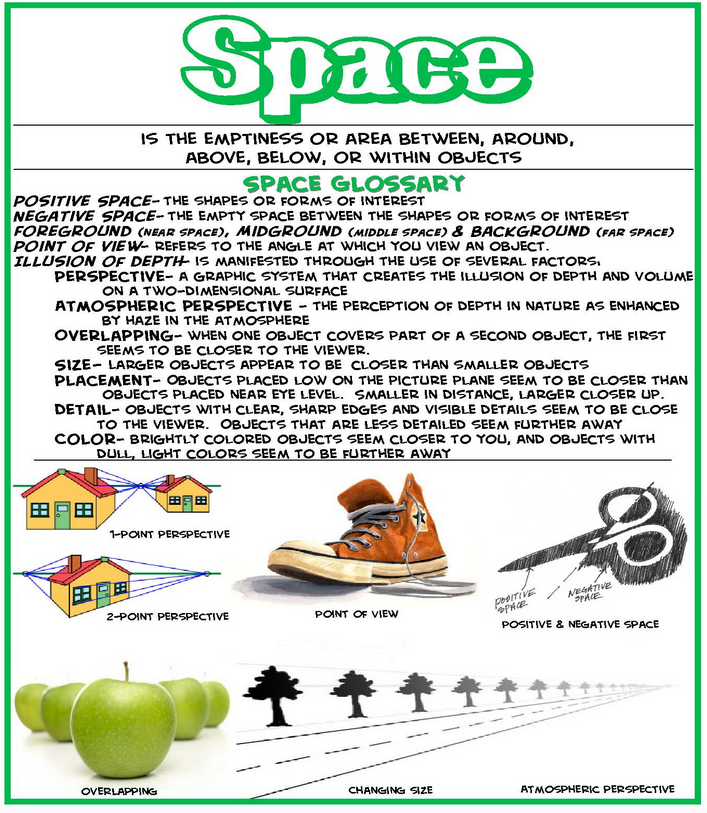
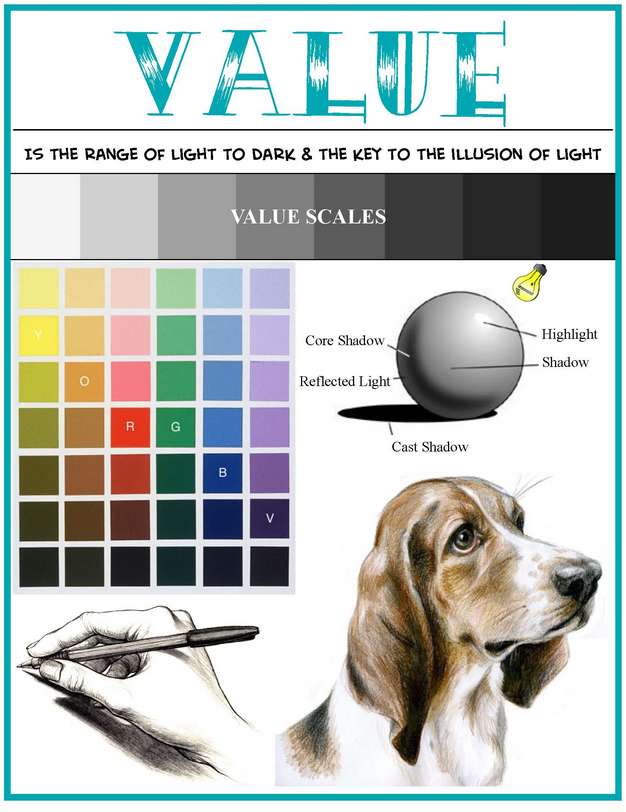
By incorporating a variety of different key elements to create depth and space, your quilts will be both interesting and appealing to viewers. Matt Fussell's graphic illustrations, in a simple but very effective manner,  describe the six key ways an artist can create space on a two-dimensional surface. This week we will focus on only the first five.

Overlapping-occurs when objects that are closer to the viewer prevent the view of objects that are behind them.

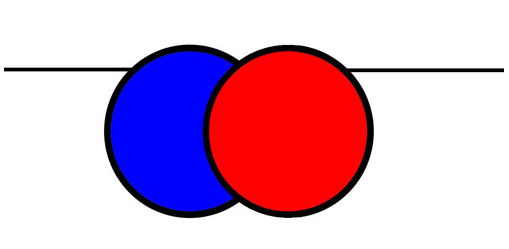
Placement-Objects placed higher within the picture plane will appear further away.


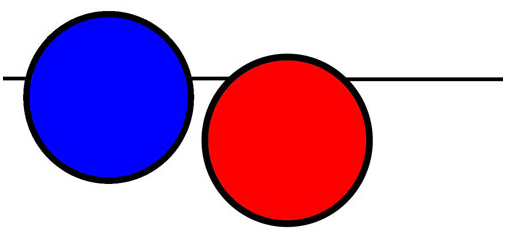
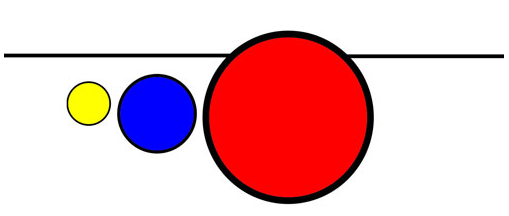
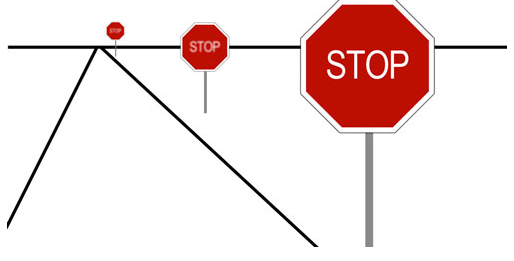
Size- Objects that are smaller will appear further away from the viewer.


Detail-Objects that are further away should have less details than those closer to the viewer.


Color and Value- Objects that are further away are cooler in color temperature, while objects that are closer are warmer.  Objects that are further away are lighter in value, while objects that are closer are typically darker in value.


Now that you have seen and understand the graphic illustrations, let's look at examples in actual quilts:

Maynard by David Taylor  Rainy Day People by Terry Aske
Placement- David Taylor (Shows 406 & 808)                                  Overlapping- Terry Aske


Pathways by Lyric Kinard Kauai, Hawaii by Judith Baker Montano
  Size- Lyric Kinard (Shows 1311 & 1710)                       Detail-Judith B. Montano (shows 201, 507, 1212)


Century Plant by Jane Sassaman Sayonara, Koji Wada by Sara Kelly
 Color and Value- Jane Sassaman (Show 301)                             Sara Kelly
 

Creating Space

By Ann P. Shaw (2006)

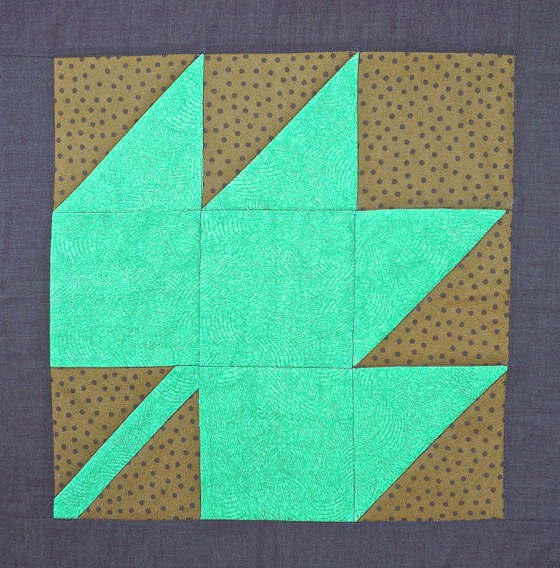
A typical traditional quilt block will feature a main pattern (such as the maple leaf pictured here) and the areas surrounding the pattern. Artists refer to the main subject (in this case the maple leaf) as “positive space” and the areas surrounding the main subject as “negative space”  (in this case the background fabric).  The balance between positive and negative space in quilt blocks varies.   As you can see, more than half the space in this Maple Leaf block contains the leaf shape, clearly distinguished by the fabric selected.  However, a quilt block like Log Cabin typically features only the strips of the log cabin pattern with no background fabric at all.  In this case, the entire block is the subject.   Traditional quilt blocks also tend to be symmetrical and are framed by a border fabric.   This creates a visually stable design.

The Maple Leaf block with its surrounding border is also what artists call a “closed composition”. All of the elements of a closed composition are contained neatly within a border or frame. When viewed, your eye is immediately drawn to the main subject that is often centered. Most traditional quilt blocks make use of this idea of closed composition, either as individual blocks or sets of blocks arranged to form larger patterns. It is this quality of stable, consistent, static patterns that lend a visually pleasing and calm quality to traditional quilts.

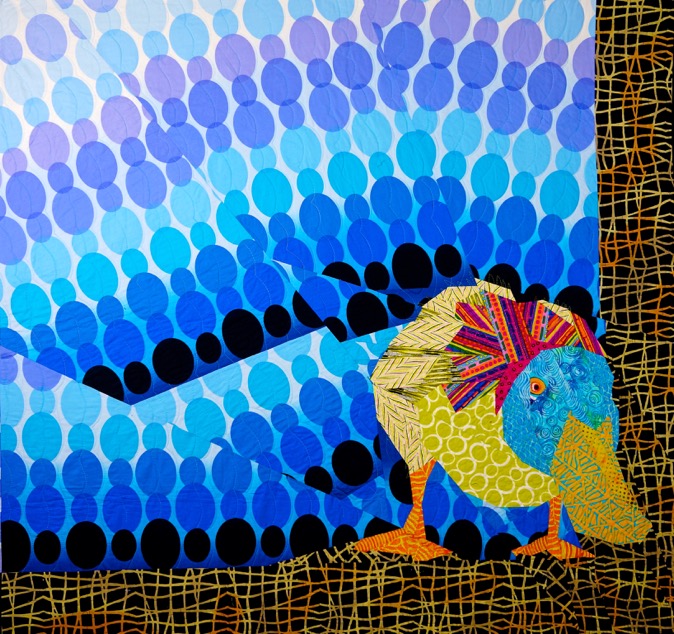
What happens when we start to create space in a quilt?  By creating space I mean what happens when we increase the amount of negative space and place the subject off center?   My quilt “Curious Duck” is a good example of what is called an “open composition”. In this case the asymmetrical placement of the duck and the angled placement of the blue ovals in the background lend a dynamic quality to the quilt. Notice there is a border only on the right side and bottom of the quilt, and Mr. Duck is playfully poking his beak beyond the background into the border. There is an implied movement in this quilt, almost as if the duck has waddled his way from the center, wondering what’s beyond the edge of the quilt. And look at the amount of negative space – it makes the duck seem much smaller relative the overall size of the quilt. The vibrant colors of the duck, the large scale and angled placement of the background print, the exaggerated amount of negative space, the asymmetrical placement of the duck in the lower corner, and the use of only two borders that are pieced as part of the overall design give this quilt a dynamic quality.

Open composition in quilts uses asymmetry, color and line placement to keep your eye moving from one element to the next.  Sometimes the subject will extend into the borders or even beyond the edge of the quilt.   In contrast to the calm, framed beauty of a closed composition quilt, an open composition quilt is visually active, inviting you to image what is beyond the edge of the quilt.

To create space in a quilt, try the following:   

·      Place the subject the quilt asymmetrically in the space.

·      Expand the amount of negative space in the design to change the proportions of subject and background.

·      Use color and pattern to create sharp contrasts between the subject and the background.

·      Use asymmetrical, partial or no borders.


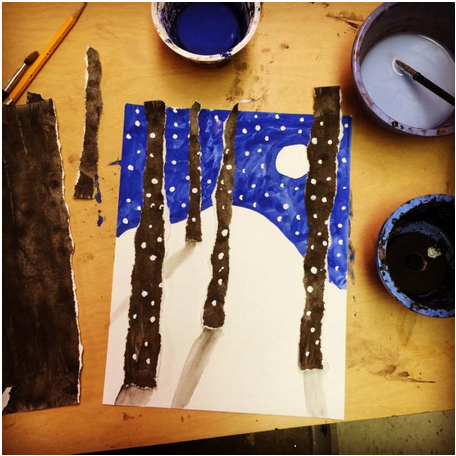
Practice Exercise: Winter Tree Landscape

by Kathy Barbro

This winter tree landscape makes use of a simple idea, namely that torn paper looks a lot like the bark edges of a tree, but needs to be done neatly for maximum impact.

Materials:

Multi media paper, two sheets
Tempera paint (blue, black, brown, white) I like the cakes
Scissors
Glue Sticks
Pencil

1. Paint a full sheet of paper with the black or brown paint.  For maximum contrast, use black. Set this paper aside to dry.
2. On the second sheet of paper, lightly draw a snow line and moon in pencil.
3. Paint the sky blue around the moon and above the snow. Set this paper aside to dry.
4. Tear the painted black paper vertically so that you have a number of 11" strips of paper. Vary the thickness of the paper strips.
5. Arrange 4 or 5 of the black strips on the blue and white background. To create a little perspective, keep the wider strips long and near the front, and the skinnier strips short and near the back. Cut away any extended portions of the strips.
6. Glue strips in place with the glue stick.
7. Dilute the black paint to make a light gray.  Paint in shadows in the snow that point away from the moon at each tree base.
8. Liberally add dots of thick white tempera to create falling snow to the scene.

Click here for more topics related to the Design to Quilt program.


5 comments
Page 371 of 553
  • Start
  • Prev
  • 366
  • 367
  • 368
  • 369
  • 370
  • 371
  • 372
  • 373
  • 374
  • 375
  • Next
  • End


Gift Memberships
Give a Full Year of Quilting
Gift Memberships


Learn about
Apliquick appliqué tools!

Watch Show 1912
with Rosa Rojas (free!)

Apliquick Rods


Apliquick - 3 Holes Microserrated Scissors


Apliquick Ergonomic Tweezers


Learn More

  • Contact Us
  • Join as a Free Member
  • Purchase a Star Membership
  • Terms of Service
  • Privacy Notice
 

Quilt Puzzles

Click To Play

Quilt Puzzles


  • Create an account
  • Forgot your username?
  • Forgot your password?

Copyright © 2020 Presented by ARJJ Corporation.
All Rights Reserved